
In this post we’ll be performing a walk-through of the installation of lnd,
we’ll take a tour of several of its features, and we’ll also introduce the
first Testnet Lightning Faucet to be compatible with lnd.
Setting up LND
As of posting time (April 7, 2017),
v0.2-alpha
is the latest release of of lnd. You should be able to follow the
walk-through below using either the latest release or the current master
branch of lnd.
There are currently two primary methods for the initial building and setting up
of lnd: manual installation directly on your host operating system, or a
fully packaged instance of lnd that uses a docker container.
Manual Build
First, the manual build. Before we begin, ensure that you have
go1.8 installed and also that your GOPATH is
set properly. Finally, you’ll also
need to have glide installed locally:
go get -u -v github.com/Masterminds/glide
Installing btcd
A node on the Lightning Network requires an up-to date view of the Bitcoin
network. Currently lnd uses btcd to provide such a view in order to
determine when a funding transaction has received enough confirmations, when a
channel is closed, whether a open channel proof is valid, when a commitment
transaction has been broadcast, etc.
Prior to standing up lnd, you’ll need an active btcd node running in
testnet mode. The following commands will properly fetch, build, and start up
your btcd node:
go get -v -u github.com/roasbeef/btcutil
cd $GOPATH/src/github.com/roasbeef/btcd
glide install
go install . ./cmd/...
With those command executed, btcd will be properly installed on your system.
Next, we’ll need to get the btcd node up and running in testnet mode (note
that you should replace kek with a username and password of your choice)
btcd --testnet --txindex --rpcuser=kek --rpcpass=kek
Before you can use lnd you’ll need to wait for btcd to finish syncing
testnet. Depending on your connection and you computer this may take several hours.
Installing lnd
With btcd installed and syncing, the next step is to repeat a similar process
to build and start lnd:
$ cd $GOPATH
$ git clone https://github.com/lightningnetwork/lnd $GOPATH/src/github.com/lightningnetwork/lnd
$ cd $GOPATH/src/github.com/lightningnetwork/lnd
$ glide install
$ go install . ./cmd/...
Once the above commands are executed, you should have both lnd (the daemon)
and lncli (the command-line interface to the daemon) properly installed.
Finally, to start your lnd node, execute the following command (replacing
“kek” with your chosen rpcuser and rpcpass for btcd selected above)
lnd --bitcoin.active --bitcoin.testnet --bitcoin.rpcuser=kek --bitcion.rpcpass=kek
Docker Build
An alternative method of installing and running lnd is provided by the lnd project’s
docker
configuration. The
docker setup provides automatic configuration for two distinct modes.
The first is a local lnd
cluster
connected to btcd instance running in simnet mode. The simnet is similar
to Bitcoin Core’s regtest mode in that is starts with a lower difficulty
allowing blocks to easily be generated by CPU’s. This configuration allows
developers to spin up an arbitrary number of local lnd instances in order
to test new features or debug conditions seen in the wild. Think of this
configuration as a lighting-network-in-a-box.
The second supported configuration packages up a btcd node running on
testnet and also a single lnd node connected to the btcd node also
running on testnet. Assuming you have both docker and docker-compose set
up, launching this configuration can be done in just a few commands:
-
First we’ll start up
btcdrunning intestnetmode:$ cd $GOPATH/src/github.com/lightningnetwork/lnd/docker $ export BITCOIN_NETWORK="testnet" $ docker-compose up -d "btcd" -
Next we’ll start up our local
lndinstance and connect it tobtcd:$ docker-compose up -d "alice"
We can easily obtain a shell to execute lncli commands directly to our
running lnd node:
$ docker exec -i -t "alice" bash
$ lncli getinfo
Or access the running logs for either btcd or lnd:
docker-compose logs alice
Controlling lnd from The Command Line
Now that we have lnd up and running, we’ll take a brief tour of the lncli
command, the command-line interface to controlling your lnd node. lncli
uses the gRPC interface to communicate directly with lnd.
The first command we’ll explore is getinfo. This command will display some
basic diagnostic information such as the latest block hash and our identity
public key:
▶ lncli getinfo
{
	"identity_pubkey": "0290bf454f4b95baf9227801301b331e35d477c6b6e7f36a599983ae58747b3828",
	"num_active_channels": 1,
	"num_peers": 1,
	"block_height": 1084917,
	"block_hash": "00000000000007d716eadfd64c238f41ccba93e9b2c3f92a28bb59c9880d1272",
	"synced_to_chain": true,
	"testnet": true
        "chains": [
            "bitcoin"
        ]
}%
The identity_pubkey field is the secp256k1 public key for your node,
encoded in compressed-point format. Within the network, any channel
advertisements by your node will include a signature under your public key and
possibly signatures of other nodes in order to authenticate all information
advertised within the network.
In order to fund the wallet within your lnd node, so you can create channels,
you’ll need to generate one of the two segwit enabled addresses that lnd
understands.
If the source of your funds understands lnd’s native segwit addresses (for
example, bcoin) then you can generate a p2wkh (pay-to-witness-key-hash)
address to send to like so:
▶ lncli newaddress p2wkh
{
	"address": "QWzDax3tQJQdQpTK3G5329UmUmpDnTcj2inn"
}%
Otherwise, you’ll need to use a nested p2sh address which are backwards compatible to existing wallets:
▶ lncli newaddress np2wkh
{
	"address": "2Muf29PfJoFoRQQ9fpH86aYENboZQAZfezD"
}%
Once your funds have been sent, you can check your lnd wallet’s available
balance (in BTC) using the walletbalance command:
▶ lncli walletbalance
{
	"balance": 4657.67016454
}%
The above command you shows the amount of funds you have available on-chain. In
order to query for your available off-chain balance (in satoshis), the
channelbalance command is provided:
▶ lncli channelbalance
{
	"balance": 99910000
}%
The logging provided by lnd is partitioned according to a particular
sub-system within the daemon. Within these sub-systems, 4 levels of logging are
exposed: error, info, debug, and trace. The trace logging level is
the most verbose and will log each step taken by lnd, the debug mode is
less verbose but will still expose in detail the daemon’s actions.
The debuglevel command is provided in order to allow users to dynamically
tune the logging verbosity of lnd. The command can either target a coarse
grained logging level:
lncli debuglevel --level_spec=trace
Or target a particular sub-system with a fine grained target:
lncli debuglevel --level=UTXN=debug
At this point, you should have a fully synced btcd running in testnet mode
along with an active lnd node connected to it. Now it’s time to experiment
with payment channels on the Lightning Network!
The Testnet Lightning Faucet
In order to streamline the process of opening your first channel, we’ve created
the Testnet Lightning Faucet.
The Testnet Lightning Faucet (TLF) is similar to other existing Bitcoin faucets. However, rather than sending bitcoin directly on-chain to a user of the faucet, the TLF will instead open a payment channel with the target user. The user can then either use their new link to the Lighting Network to facilitate payments, or immediately close the channel (which immediately credits them on-chain like regular faucets).
Currently, the TLF is only compatible with lnd, but in the near future as the
other Lightning implementations (eclair, c-lightning, lit, and more) become
available, our hope is that the faucet will also be usable with these active
implementations.
The faucet can be found at faucet.lightning.community.
Faucet Constraints
Before we get started, it’s worth pointing out that the TLF currently has a few contraints:
- The faucet will only create one channel per user.
- The maximum channel size the faucet will create is
4 million satoshis - Finally, there’s a minimum channel size of
10k satoshis
Claiming Your Channel
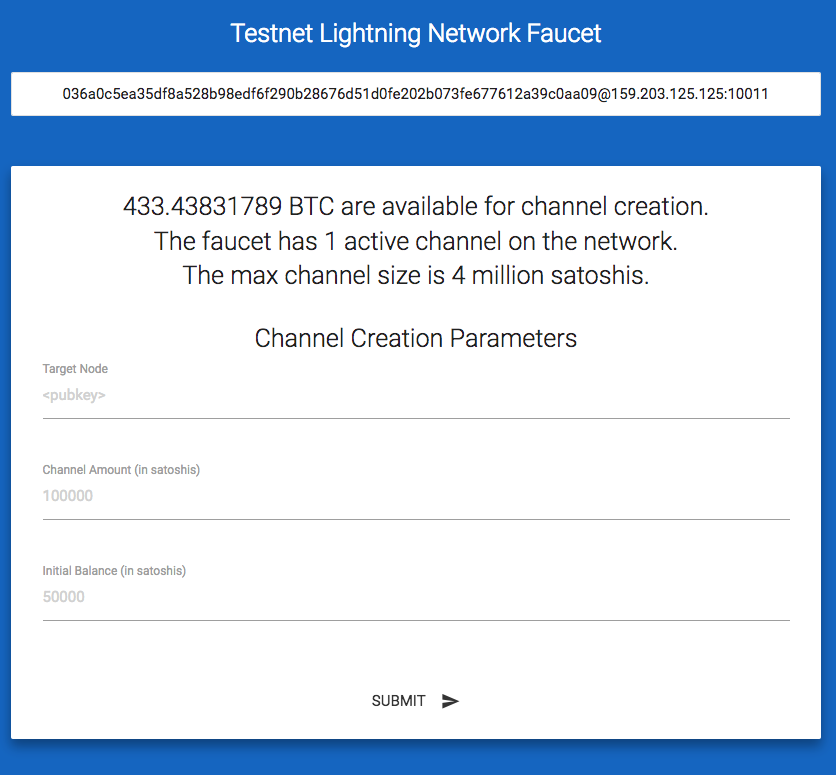
Once you visit faucet.lightning.community, you’ll see the following page:
In order to obtain your channel, you’ll need to first connect out to the
faucet’s lnd node:
lncli connect 02f1da524a70afd8de6019e2367b47d8d41a623aa3594f55d0785fe1b047c853bc@faucet.lightning.community:9735
The hex characters within that command are the faucet’s public key. The public key of a node is required to connect to a node due to the Lightning Network’s peer-to-peer cryptographic messaging scheme.
Once you connect out to the faucet’s node, it should show up under lnd’s list
of active peers:
▶ lncli listpeers
{
	"peers": [
		{
			"pub_key": "02f1da524a70afd8de6019e2367b47d8d41a623aa3594f55d0785fe1b047c853bc",
			"peer_id": 1,
			"address": "159.203.125.125:9735",
			"bytes_sent": 5012,
			"bytes_recv": 4646
		}
	]
}%
With your node connected, it’s time to finally establish your channel! In order to have the faucet create a channel with you, you’ll need to fill out the three fields in the Channel Creation form:
- Target Node
- The public key of your node (obtained from the “identity_pubkey” field
in the
getinfocommand)
- The public key of your node (obtained from the “identity_pubkey” field
in the
- Channel Amount
- The amount of satoshis the faucet should use to fund the channel.
- Initial Balance
- The amount of satoshis to be pushed to your side as your “local balance” during channel creation. This allows you to start with some funds at the initial channel state. This value must be less than the Channel Amount specified above.
Once the above fields are populated:
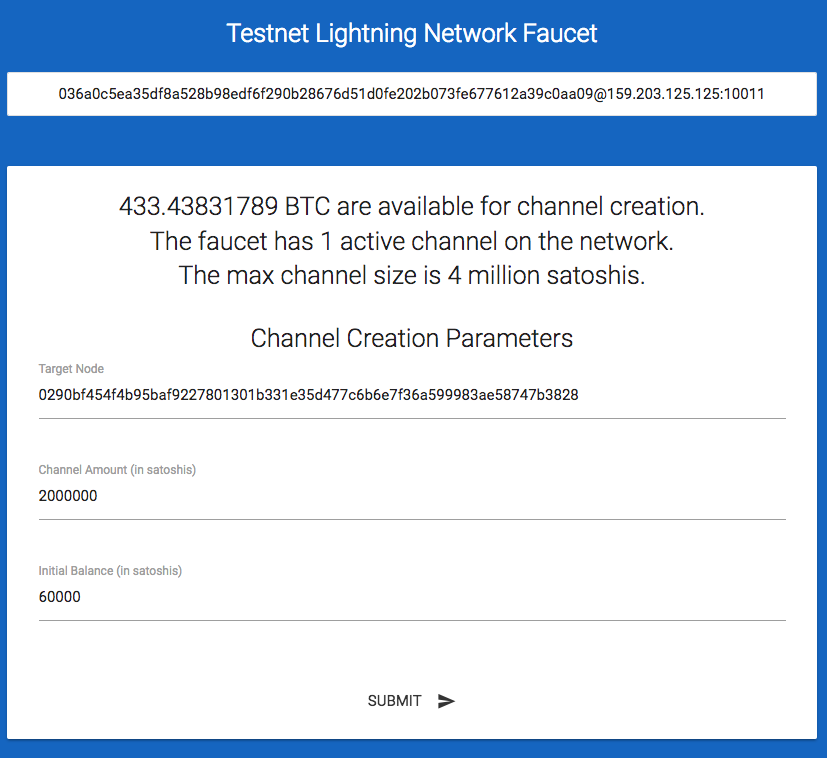
Press the SUBMIT button in order to create your channel. If successful, you
should see a page like this:
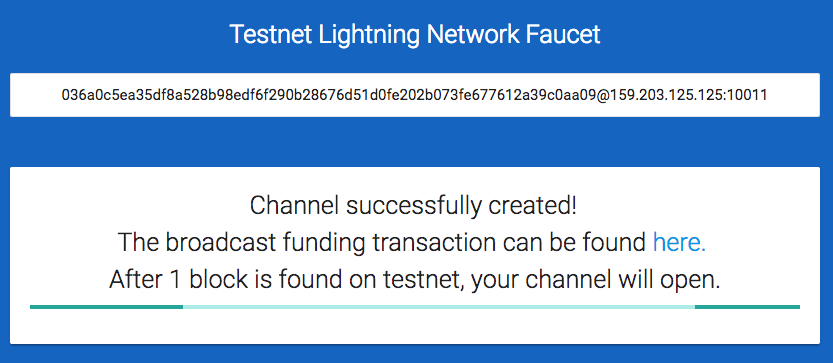
Exploring the link displayed on the page, you’ll be able to see the funding transaction which will ultimately open the channel like this one here.
Using the pendingchannels command, you’ll be able to see the channel in the
making:
▶ lncli pendingchannels
{
	"pending_channels": [
		{
			"peer_id": 1,
			"identity_key": "02f1da524a70afd8de6019e2367b47d8d41a623aa3594f55d0785fe1b047c853bc",
			"channel_point": "2e9fece24d4db39649edac3991d2e0913277a8ce5aec52e83fcd9c374aefb8d3:0",
			"capacity": 2060000,
			"local_balance": 60000,
			"remote_balance": 2000000,
			"status": 1
		}
	]
}%
Note in the current release, you’ll need to leave your computer active until
the next block arrives. Once the funding transaction confirms, you channel will
be open and you can monitor its state using the listchannels command:
▶ lncli listchannels
{
	"channels": [
		{
			"remote_pubkey": "02f1da524a70afd8de6019e2367b47d8d41a623aa3594f55d0785fe1b047c853bc",
			"channel_point": "2e9fece24d4db39649edac3991d2e0913277a8ce5aec52e83fcd9c374aefb8d3:0",
			"chan_id": 1192884354230517760,
			"capacity": 2005000,
			"local_balance": 60000,
			"remote_balance": 1940000
		}
	]
}%
Sending a Multi-Hop Payment
Alright, so at this point you have a running lnd daemon connected to the
network on testnet and you have an active payment channel open with the
faucet. Now it’s time to send some multi-hop payments!
A series of commands is bundled with lncli that allow you to explore the
channel graph from the PoV of your node:
▶ lncli getnetworkinfo
{
	"avg_out_degree": 0.55,
	"max_out_degree": 5,
	"num_nodes": 20,
	"num_channels": 11,
	"total_network_capacity": 420010997,
	"avg_channel_size": 3.818281790909091e+07,
	"min_channel_size": 1000,
	"max_channel_size": 100000000
}%
As you can see from the above command at the time of writing, my local node
knew of 20 other lnd nodes connected by 11 channels within the network.
Amongst these channels, the total number of BTC contained within them tallies
up 4.2 BTC.
The describegraph command will display your node’s view of the active channel
graph (output is truncated):
▶ lncli describegraph
{
	"nodes": [
		<snip>
		{
			"last_update": 1484790531,
			"pub_key": "021b96642e723592ee0b095983fe3a26c8b40b8926968d8b7510e51c9429d4562c",
			"address": "[::]:9735",
			"alias": "021b96642e723592ee0b"
		},
		{
			"last_update": 1484470838,
			"pub_key": "03dd27dc7f994d932b74bebaf18bf801447a514eb4fb33b0f8000b33c036e51ed2",
			"address": "[::]:9735",
			"alias": "03dd27dc7f994d932b74"
		}
	],
	"edges": [
		<snip>
		{
			"channel_id": 1190433542811877376,
			"chan_point": "dc23b797a618ff0d56e43c164f3d52a109df7ff8a2ee81771f73da42430af273:0",
			"last_update": 1484423578,
			"node1_pub": "038988b891e37825182b3c65295c93b73a890e05d83a9db78e8e7ba8d736ec347b",
			"node2_pub": "03d09c932052547c16e83d676ed4014a09b5b2d9890b5ae35bf8d97459e9bb00ae",
			"capacity": 1000000,
			"node1_policy": {
				"time_lock_delta": 1
			},
			"node2_policy": {
				"time_lock_delta": 1
			}
		},
		{
			"channel_id": 1192884354230517760,
			"chan_point": "2e9fece24d4db39649edac3991d2e0913277a8ce5aec52e83fcd9c374aefb8d3:0",
			"last_update": 1484858485,
			"node1_pub": "0290bf454f4b95baf9227801301b331e35d477c6b6e7f36a599983ae58747b3828",
			"node2_pub": "02f1da524a70afd8de6019e2367b47d8d41a623aa3594f55d0785fe1b047c853bc",
			"capacity": 1999999,
			"node1_policy": {
				"time_lock_delta": 1
			},
			"node2_policy": {
				"time_lock_delta": 1
			}
		}
	]
}%
The queryroute command can be used to test the existence of a route between
your node and a target node:
▶ lncli queryroute --dest=03c3cbc887448ff950c32a3561441249f1983322519fcea18cbb7769cbd2f4b995 --amt=1000
{
	"total_time_lock": 3,
	"total_amt": 1000,
	"hops": [
		{
			"chan_id": 1192884354230517760,
			"chan_capacity": 1999999,
			"amt_to_forward": 1000
		},
		{
			"chan_id": 1190997592276926465,
			"chan_capacity": 100000000,
			"amt_to_forward": 1000
		},
		{
			"chan_id": 1192650158253473792,
			"chan_capacity": 100000000,
			"amt_to_forward": 1000
		}
	]
}
Here we see that from my node, I have a path that crosses 3 channels and 4
nodes to my target destination. We can see that the channel I created just now
(the chan_id’s match) with the faucet is the first-hop in my multi-hop route
to the destination.
If I’m not running with the --debug-htlc flag on, then once I obtain a
payment request from the payee, I’ll be able to send the funds over Lightning:
▶ lncli sendpayment --pay_req=yxbhz1r8e1891wgdfe4snty1j8a3oc3nkgxh7ecczp5su16161h3kpu3a9a7pfs63aa14h9bsp17jppm53qquf1x8pzedobcsuouxqgpyyyyyyyyyyb6otom1t8o
{
	"payment_route": {
		"total_time_lock": 3,
		"total_amt": 1000,
		"hops": [
			{
				"chan_id": 1192884354230517760,
				"chan_capacity": 1999999,
				"amt_to_forward": 1000
			},
			{
				"chan_id": 1190997592276926465,
				"chan_capacity": 100000000,
				"amt_to_forward": 1000
			},
			{
				"chan_id": 1192650158253473792,
				"chan_capacity": 100000000,
				"amt_to_forward": 1000
			}
		]
	}
}%
The result of the sendpayment command shows the path that my payment traveled
along within the network to reach the final destination. If we check our
channel, we can see the latest state of the channel:
▶ lncli listchannels
{
	"channels": [
		{
			"remote_pubkey": "02f1da524a70afd8de6019e2367b47d8d41a623aa3594f55d0785fe1b047c853bc",
			"channel_point": "2e9fece24d4db39649edac3991d2e0913277a8ce5aec52e83fcd9c374aefb8d3:0",
			"chan_id": 1192884354230517760,
			"capacity": 2005000,
			"local_balance": 59000,
			"remote_balance": 1941000,
			"total_satoshis_sent": 1000,
			"num_updates": 2
		}
	]
}%
If we use the decodepayreq command, then we can see the payment conditions
encoded in the payment request:
▶ lncli decodepayreq --pay_req=yxbhz1r8e1891wgdfe4snty1j8a3oc3nkgxh7ecczp5su16161h3kpu3a9a7pfs63aa14h9bsp17jppm53qquf1x8pzedobcsuouxqgpyyyyyyyyyyb6otom1t8o
{
	"destination": "03c3cbc887448ff950c32a3561441249f1983322519fcea18cbb7769cbd2f4b995",
	"payment_hash": "3679c7f1d696dece312d73e1b365d4b5abde5ce9964f3b6e81c02cb4e137b8cd",
	"num_satoshis": 1000
}%
This concludes our walkthrough of lnd’s current capabilities, the Testnet
Lightning Faucet, and a multi-hop payment demonstration. Any questions or
issues can be directed at either the #lnd channel on
freenode, or within the Github
issues for lnd.
Testnet Lightning Faucet Source Code
The faucet demonstrated within this blog post is live on Testnet, is fully open
source and can be found
here. The faucet is easy
to deploy as once it’s built, it generates a single statically linked binary
that only requires a local lnd in order to function. The source of the faucet
also includes automatic Let’s Encrypt registration
in order to obtain a free TLS certificate for your personal channel faucet.
In the coming weeks, the TLF will expand into a full-blown channel explorer for
lnd’s sub-network on Bitcoin’s Testnet. Once the channel explorer is
finished, a similar blog post will be uploaded explaining the features and
inner workings of the faucet.